

After years of admiring kei vans on the streets of Japan and wishing I had one to drive at home in Colorado, I took the plunge and bought a 1996 Subaru Sambar Dias II Maleza Super Charger 4WD that already had Washington registration but needed a few repairs to be a reliable driver. How hard could it be?
Yes, 658 screaming supercharged cubic centimeters of JDM power lying on its side behind the rear bumper, driving all four wheels through the same oddball CVT used by the Subaru Justy. Great on snow and ice, gets close to 60 miles per gallon in the city, fits an amazing amount of cargo, beloved by the Denver masses.
One small but interesting feature of my van is its shaken safety inspection sticker, which shows an expiration date of the second month of Year 32 of the Heisei Era. As it happened, Emperor Akihito (who drove a Honda Integra) abdicated in April of 2019, which was Heisei 31, so Heisei 32 never happened; instead, Japan went to Year 1 of the Reiwa Era.
Once I fixed the stalling problem (vacuum leaks) and got it smogged and registered in Denver County (years before HB25-1281 was signed into law), next up on the list was the broken HVAC blower fan.
My van was built with both factory air conditioning and a secondary heater for the rear-seat passengers, but the main blower fan behind the dash was stone dead. That meant that I had to drive with all the windows down on hot days, which was a real drag at highway speed with the engine howling at seven grand and the CVT making its disturbing early-days-of-CVT-technology sounds. The seller had bought the car in Japan and picked up an allegedly new and theoretically correct blower fan before shipping it over, so I figured I had the part I needed.
Accessing the blower fan in a Sambar isn’t as tough as it is in, say, a Volvo 240, but you do need to remove the entire dash assembly.
This involves some finicky fasteners and sticky near-30-year-old electrical connectors, but Subaru generally tries to make their cars easy to work on and it went quickly enough.
Once I had everything apart, I blew the JDM dust out of the short-and-simple HVAC ducting with compressed air.
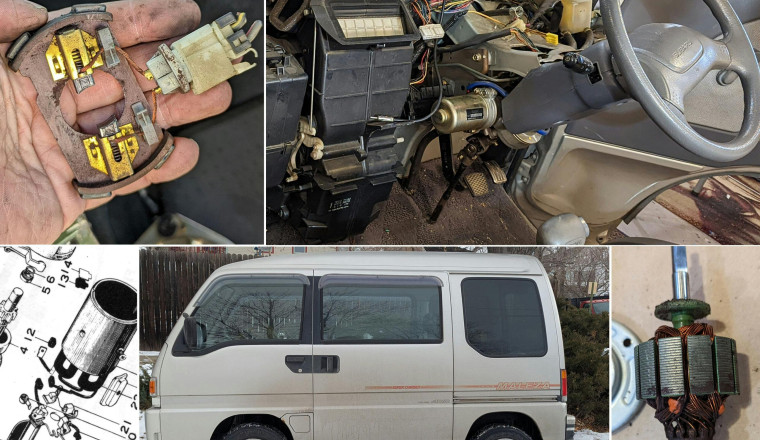
Once I pulled out the dead original blower fan (left, with black plastic bracket), I realized that my supposedly correct replacement fan (right, with gold metal bracket) was incorrect.
Not only that, it wasn’t a new part. Once I opened it up, I realized that some shady Japanese parts supplier had done the blower fan equivalent of a “Krylon engine rebuild” on a thoroughly worn-out component, cleaning up the exterior of what was probably a bad core return.
I had some PDFs of factory manuals and parts lists, all in Japanese, and I’d had success buying parts from reputable JDM suppliers (I have had only good experiences buying from Amayama and Megazip). I figured I could order a new blower fan and have it in my hands within a couple of weeks. However, Subaru used a bewildering variety of HVAC blower fans on the Sambar during the mid-to-late 1990s, with plenty of mid-model-year changes plus much-updated part numbers and so on.
Then I remembered those auto shop classes from my high school years of the early 1980s, where we were taught how to rebuild automotive generators and motors using documentation from the 1940s-1960s. By that time, cheap new and remanufactured parts were available and few people my age were trying to fix such components; the whole exercise seemed nearly as old-fashioned as, say, learning how to rebabbit bearings in the family Hupmobile. But I’d replaced brushes in 1950s and 1960s generators and I could identify electric motor components, so I figured I’d take a shot at making one good blower fan out of two bad ones.
Make that three bad ones, because I’m always ready to do some junkyard parts shopping (in fact, one big reason I never learned to rebuild automotive electric motors back in my formative automotive years was that it was so easy to just throw junkyard parts at a problem). I headed over to my favorite Denver-area car graveyard to go yank an HVAC blower fan from a discarded USDM Subaru of about the same vintage as my JDM Subaru. While the Justy was the closest powertrain relative of the 1990s Sambar (though still not very close to it on the global Subaru family tree), I figured the widely sold—and easier to find nowadays in Subaru-heavy Colorado car graveyards—second-generation Legacy would be my best bet.
It wasn’t a terrible ordeal to extract this fan, which sure looked similar to the incorrect fan that came as a spare with my van. But I didn’t need the whole thing.
So I disassembled it at the junkyard and bought the brush assembly and harness connector.
My plan was to dump all the components of three related— likely all made by Aisin, Denso, or Niles— blower fan assemblies in a pile on my workbench and use the least bad components to mix-and-match a working unit. The one that came out of my Sambar required quite a bit of force to turn by hand, so I knew I’d find a lot of ugly stuff inside.
The shaft and windings assembly of the Sambar’s motor seemed good enough, if completely nastified by motor schmutz, so that was a starting point. Maybe I could get away with swapping bearings, cleaning the commutator surface, and installing the least-bad brushes in my collection.
Since I knew I could unlock the mysteries involved with obtaining correct OEM replacement part from Japan eventually (though perhaps at the cost of paying both-ways shipping on incorrect components I’d have to return), I had nothing to lose with this project. The guts of the incorrect JDM blower fan motor assembly looked very similar to internals of the Sambar’s motor, maybe a first cousin if not a sibling, which was a good sign.
The commutator diameters of all three motors involved in this project were identical, so I could mix-and-match parts easily enough. I took the two best brushes and two best brush springs and installed them in the Sambar motor. This involved some finicky soldering but wasn’t too difficult. I swapped the not-so-terrible bearings over from the incorrect JDM blower fan and reassembled everything.
It worked! Back into the dash it went.
But I had a modification I wanted to do while I still had the Sambar’s dash apart. I camp in my little van when I serve as a wise and fair judge at the 24 Hours of Lemons races at High Plains Raceway in western Kansas eastern Colorado, and I wanted such camping to be a bit more comfortable.
Sambar vans are often used for camping and family road trips in Japan. The seats fold up to make a flat floor long enough for a six-footer to stretch out (and for two six-footers to camp together, provided they really like each other’s very close company), and I have magnet-mount curtains for privacy.
It’s very comfortable to camp in here, except for one problem: I’m a light sleeper, and the combination of racers wrenching on their broken cars overnight and jake-braking semis on nearby Route 36 meant I had to choose between rolling the windows up completely and breathing increasingly stuffy air or cracking the windows and being awakened by noise every half-hour or so.
Now, I could have taken the traditional RV route and rigged up a 12-volt DC power supply (or even a quick-and-dirty battery-charger hookup) to run the van on external paddock power with the ignition switch in ACC position, allowing the blower fan to vent the vehicle with the windows rolled up. Instead, I took advantage of the disassembled dash to install a pair of (junkyard-obtained, of course) SPDT relays to switch the power terminals on the HVAC blower motor to an external three-pin connector (I know, I could have gotten away with a single relay on the positive side and left the ground wiring as-is, but relays are cheap and I wanted to isolate the circuit on both sides).
The connector I used comes from under the dash of a Volvo 240; I don’t know what it’s for, but it’s very easy to access in a junkyard car. I’ve got a whole box of these that I’ve gathered over the years, which I’ll use when I finally get my gigantic hoard collection of junkyard-obtained car clocks installed on one big powered display (you need three wires to power and light up an illuminated car clock).
Since my new blower fan wiring bypassed the Sambar’s dash controls, my external power source would need a means of varying the fan speed (I could have just fed 12 volts DC right into the fan, but then it would roar at full speed and annoy me). I went back to the junkyard and harvested the dash fan switch and fan resistor assemblies from another mid-1990s Subaru Legacy. I’d already noted the easy-to-reach resistor assembly location while pulling a Legacy fan earlier and I assumed that the three resistors would be calibrated to work with a motor with the same specs as the one in my van and would give me three useful fan speeds to choose from.
Race day was approaching and I ran out of time to build a nice case for the cheap Chinese 12VDC power supply with proper cooling for the resistors plus a good external mount for the fan speed switch, so I wired everything up and shoved the whole mess deep under the van where it wouldn’t get rained on. Building a race car can involve compromises like this, too.
The Sambar has thick, squishy door weatherstripping, so I just hook up the connector inside and slam the door on the harness. Don’t worry, everything is fuse-protected.
For the next race, I needed a real case for the Sambar’s camping HVAC blower controller/power supply, and the proper solution was obvious: build everything into a car-parts boombox, which could then be used to provide music for the traditional Colorado Lemons race Saturday-night potluck party in the paddock. I’ve already built a bunch of such creations over the years, including the Spectra Slapper (built around a 2009 Kia Spectra radio and equipped with dual Lincoln Navigator amplifiers and subwoofers) and Jerry Brown Suede Denim Secret Police boomboxes that you see in the photo above.
The Spectra Slapper pumps out tremendously loud beats, plus it features beat-controlled flashing lights (including the illuminated grab handle on top, which I sourced from a junkyard conversion van), but it weighs about 80 pounds and took me weeks to build. What I had in mind was a simpler boombox built into a much smaller enclosure, something that would fit under the van while in operation while still producing reasonably potent sounds for paddock parties.
A Lemons team had bribed their favorite judge with a cheap camera case stuffed with Monopoly money and bags of flour a few years before, so I opted to use that case as my boombox/power supply enclosure. Into the lid went two pairs of small but high-quality speakers that are cheap and easy to find in junkyards: one set from the rear doors of a mid-1990s Lexus LS 400 and the other set from the “Music Gate” tailgate-party hatch speakers from a late-2000s Dodge Caliber. The former are Pioneers and the latter was made by Boston Acoustics.
The head unit had to be a single-DIN radio to fit the case, and I wanted it to have 24 Hours of Lemons provenance. The choice ended up being an early-2000s Kia Rio AM/FM/CD rig that was given to me by a team that bought an entire car on Craigslist (during a race) as an engine donor and gave away all the other parts on the car to anyone who could use them. The cooling fan above the RIO badge began its career keeping the ECM from overheating in a mid-2000s Volvo S60.
In addition to the Rio radio, the main body of the case contains the 120VAC-to-12VDC power supply with external fused power-cord connector, the Legacy blower-fan switch, and the case-to-van connector. There’s a wired FM modulator taking its signal from a cheap Bluetooth circuit board (which gets its power from an even cheaper USB power board) and feeding that signal into the antenna connector of the radio. There’s also an external antenna connector on the back side, into which plugs a telescoping FM antenna with RCA jack (so that my “Accent Oonsker” boombox with built-in FM transmitter can send it music).
There’s also a junkyard-obtained lighter jack (visible on the right side of the case, immediately behind the fan speed switch in this photo), so that phone chargers and other accessories can be powered from this boombox. The case-to-Sambar power cable is held in the lid by a couple of Velcro loops, while the external FM antenna is clipped to its left. There’s enough powered ventilation flowing through the case to keep the power supply and blower fan resistors cool.
I used a yellow airbag electrical connector from a Honda Civic for the case-to-Sambar cable, because it had three connectors and looked cool with its bad-boy Takata recall provenance.
The square button switch on the lid (sourced from the map light of a first-generation Lexus LS 400) activates the Bluetooth/FM modulator circuits, and is protected from damage by a couple of junkyard-obtained tie-downs. The long speaker mounting screws (covered by injury-preventing rubber caps) keep the speakers safe if the box falls on its face. The stencil is the Jeppson Malört logo, because Malört has become the signature party drink of Colorado 24 Hours of Lemons racers (it’s upside-down because I wanted it to read correctly while the boombox was on the ground powering my van).
It has been a welcome addition to the pit parties at HPR races, not especially loud but serving well when placed a few pit spaces down from the bigger junkyard boomboxes and picking up the music on its FM antenna.
I often use it for playing music from my smartphone via Bluetooth while working in the garage (where it lives on a dedicated shelf next to the Spectra Slapper), even though there are more powerful boomboxes nearby. The sound quality is decent at lower volumes and it’s very easy to boot up and get connected to Bluetooth devices.
I took the Kia Rio Suitcase Boombox (as I call it) to the B.F.E. GP 24 Hours of Lemons a couple of weeks back, along with an all-new boombox made using the complete Nakamichi Audio system from a 1998 Lexus LS 400 (the Nakamichi subwoofer uses an orange Home Depot bucket as an enclosure). Here’s the scene as I unpacked the van to set up my campsite.
I used Chicago and Detroit flags as curtains, as one does.
I leave the fan on the lowest setting overnight, which works well to keep the air inside the van fresh while I enjoy the quiet of rolled-up windows. When it’s time to deploy the boombox as a source of party audio, it takes just seconds to disconnect it from the van.
I love the homemade OEM radio boom boxes. Props on the Home Depot Subwoofer enclosure.
I’m exhausted after that. Wow. Bravo!
Yokohama Motors got a new rear evaporator for my Space Gear.


