

Summer shows are done, the nights are drawing in and that familiar dread kicks in – it’s time to tuck the car away. Get it wrong and your pride and joy can emerge in spring looking worse for wear, with knackered tyres, mouldy carpets or a rusty fuel tank. Get it right and you’ll be turning the key in a car that feels even better than you remember.
In this guide we walk through five essential winter car storage tips, using a Mk3 Escort cabriolet as the guinea pig. From washing and drying properly, to dealing with fuel, batteries, tyres and covers, this is your no-nonsense checklist for storing a classic or modern safely over winter.
If you live in the UK, you’ll know winter isn’t kind to cars. Roads get salty, damp finds its way into every crevice, and anything with a bit of metal and age starts to suffer. Whether you’re dealing with a classic car, a weekend toy or just a cherished daily you don’t want ruined by road salt, winter car storage tips like these will help you avoid nasty surprises when the sun comes back.
We grabbed our mate’s Mk3 Escort cabriolet and roped in Joe from our sister channel, Classics World, to show what we actually do before parking a car up for a few months.
First job? Give the outside a proper wash. You really don’t want to put a car away with dirt, grime, tree sap and bird mess all over it – that stuff can eat into paint and lacquer over time, especially on older paint and soft-top roofs.
Any moisture and muck trapped in the arches will just sit there and quietly attack your metalwork over winter, particularly around body kits and arch trims. So blast it out now before you put teh car away for winter.
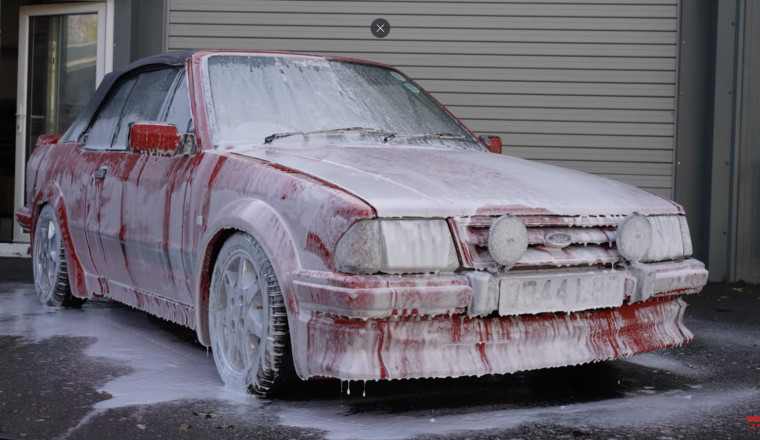
Because we were dealing with a soft-top Escort, we had to be gentle on the roof. That’s why we used a Nilfisk Excellent 160 pressure washer with a three-in-one nozzle, so we could quickly switch from a stronger jet on the lower sections to a softer fan on the roof and more delicate areas.
We started with a snow foam pre-wash to loosen the heavy dirt (handily, the Excellent 160 comes with a snow foam sprayer in the kit), then rinsed it off on a gentle setting before doing a proper contact wash with a mitt and shampoo. The aim is to strip off road grime and contaminants, not blast the car to bits.
One of our favourite extras is Nilfisk’s 90° underbody attachment. It uses Nilfisk’s Click & Clean system so switching is easy. Click it into the end of the lance and you can blast under the sills and inside the wheelarches without crawling around on the floor. It’s ideal for clearing out trapped mud and salt before storage.
This is especially important for cars with wide arched or bodykits – anything left sitting in there wet over winter is basically rust waiting to happen.
If you’ve spent decent money on a pressure washer and cleaning kit, look after it by storing them correctly. Follow these simple steps and prolong the life of your new machine.
It sounds overkill, but it stops water sitting inside and helps prevent freezing damage or mould.
Once the car’s inside, it’s time to sort the cabin. Dusty dashboards and a bit of mud in the carpet might not seem like a big deal, but damp, dirt and crumbs left in place are basically a party invite for mould and musty smells. Food crumbs invite mice to feast on your lovely interior, while damp will leave your steering wheel and seatbelts looking like a Petri dish school science experiment come spring!
We gave the interior a full once-over: cleared out junk, wiped the dash and plastics, then went in with a vacuum on the carpets and seats. Simple, but you’ll thank yourself in spring. We called on Nilfisk again, this time using their Multi II 30 T Wet & Dry vacuum cleaner. Not only is the 1400W motor powerful enough to lift even the most stubborn dirt from the seats and carpets, but the extra long 4m hose is easy to get into all areas of even the most cramped interior.
Here’s a clever tip. The Nilfisk vacuum we used can swap the hose from suction to blower mode using the exhaust port. That turns it into a handy dryer.
We used it to blow moisture out from under the soft-top hood, the door seals and rubbers, and tight little like under teh boot spoiler spots you can’t reach with a towel. The aim is to get the car as bone dry as possible before it goes under a cover.
This one surprises a lot of people. It feels counter-intuitive to fill the tank before parking the car for six months, but there’s logic behind it.
When you store a car with a half-empty tank, you’re leaving a big air gap above the fuel. That air holds moisture, and over time condensation forms inside the tank, which can lead to rust – especially on older cars with metal fuel tanks and metal pumps.
By filling the tank right to the brim, you minimise the amount of air and therefore condensation. Less air means less moisture, and less moisture means less internal rust. Simple.
If you want to go one better, use a fuel stabiliser. As we mention in the video, brands like Liqui Moly sell stabilisers for around a £10-15 a bottle. They help stop the fuel going stale and protect the system if the car is standing for a while.
Flat batteries are a classic springtime problem. Modern cars are especially bad, with alarms, ECUs and convenience functions gently sipping away at your battery for weeks.
You’ve basically got two options:
On older cars without complex electronics – think classics, simple 80s/90s stuff – you can simply disconnect the battery once you’ve parked up. That stops any slow drain and leaves the battery ready for action, as long as it’s healthy to begin with.
Just remember you may lose radio presets or alarm settings.
On more modern cars, with multiple ECUs and complex systems that don’t like losing power, it’s often better to hook up a smart trickle charger instead. That keeps the battery topped up, stops it sulphating, and prevents you having to re-code or re-sync everything in spring.
Not all car covers are created equal. And you’ll need a different cover if you’re storing your car inside or outdoors. We’d always recommend putting your car away safely in a garage or storage lock-up if possible, and therefore yoou’ll want an indoor car cover.
Avoid cheap, plasticky or tarpaulin-style covers that can trap moisture and mark paint. Instead, opt for a soft, plush cover that won’t scratch your paint or soft-top. It’s also importtant to choose the right size cover – too small and it won’t fit properly; too baggy and it will move around and potentially rub grit against the paint.
Take a minute to position it properly so the wheels and lower bodywork are covered. Done right, a good indoor car cover is like a dust-proof duvet for your pride and joy.
First up – tell your insurance company the car is off the road and in storage. Don’t cancel cover (you still want protection against fire, theft, etc.), but many insurers will reduce your premium if the car’s not being driven.
Next, in the UK you should SORN the vehicle if it’s not being used on public roads. The key trick is timing. Do it before the 1st of the month if you want a tax refund for the whole upcoming month.
Cars that sit still for months have a habit of seizing up in all the annoying places. While the bonnet’s up and the doors are open, grab some light lube or penetrating fluid (WD-40, similar tacky lube, etc.) and give a quick squirt to areas like door hinges and latches, bonnet hinges and release mechanism, and oot hinges and catches. The last thing you want come spring is a stuck bonnet cable or creaking doors because everything’s dried out.
Also, handbrakes have a tendancy to stick and sieze if let on for long periods of time. So use chocks and/or leave the car in gear rather than the handbrake on while in storage.
Ideally, you want the car on axle stands or tyre savers to take the weight off the tyres. That helps avoid flat spots and cracking.
If that’s not practical, a good compromise is to add a couple of extra PSI to each tyre before storage. Pump them up, park the car, and remember to drop them back to normal pressures before you drive it again.
To wrap it up, here’s a quick checklist based on the steps we used on our Escort cabriolet:
Spend half a day doing this now and your car will thank you in spring – no mould, no flat tyres, no nasty fuel or battery surprises.